Nuffnang Ads

Showing posts with label sides. Show all posts

Friday, May 16, 2014

Ngor Hiang- Sweet and Juicy

This was my virgin try on preparing ngor hiang and it was a success, except maybe for the art in wrapping it which I have yet to master.

Decided to cook this as my hubby loves eating ngor hiang. I guess it is probably his comfort food since growing up with it as he is a hokkien and his mum cooks that a lot!

This recipe was shared by my facebook home cooking group which I joined. Enjoy!
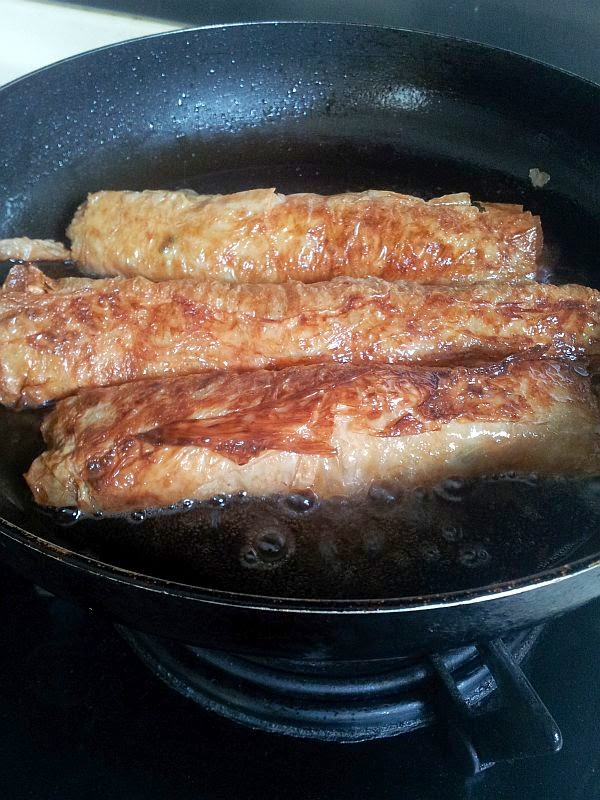
Picture adapted from the Facebook Cooking Group

Ingredients
- 1 kg of minced meat
- 300g of water chestnut
- 1/2 kg of prawns
- 2 big onions
- $2 worth of fish paste
- bean curd skin (the soft ones)
- 1 egg

Steps
1) Use a damp cloth to clean the bean curd sheets if not it will be very very salty
2) Steam the bean curd skin by covering with the cloth so that the water doesn't drop onto the sheets
3) Prepare the paste - minced the prawns, onions, and water chestnut. Add the minced meat and fish paste. Crack and egg and mix it altogether. Season with pepper and corn flour. (no need salt as the skin is salty already!) I added spring onions to give the colour and because I had it in my fridge and didn't know how else to use it before it withers beyond its of use.


4) Wrap the paste with the bean curd skin


5) After wrapping all up, deep fry them and voila, nice and crispy sides to go with for your lunch or dinner!


Wednesday, November 6, 2013

Herbed Garlic Bread

Making your own garlic bread is a point of no return- once you learnt how to do it, you will never want to buy those frozen garlic bread from supermarkets or from any pizza fast food restaurants. It is not only easy but the taste and crunch is so much better and fresher. The best thing is that you can make the garlic bread paste and store in the fridge for breakfast spread as and when you like or even for grilling your prawns or marinating your chicken/beef.

So each time I make, I will make lots of it to store. It will come in very handy!

Ingredients
- 10 cloves of garlic
- 250g of butter (whole block)
- chopped parsley (best if its fresh. I couldn't find. So I used dried)
- olive oil
- 1 tsp of salt
- grated Parmesan cheese (optional)

Steps
1) Peel the garlic and add into the blender together with salt, parsley and olive oil. Just add enough olive oil to smoothen and blend the mixture.

2) Blend the above ingredients first

3) Then add the unsalted butter in, batch by batch and blend


After that, you will just add up like margarine texture but with the garlic and herb taste and smell. Really yummy.

Then you just spread it on your french loaf or any kind of bread, top with parmesan cheese (optional) and toast it!

Serve this with a warm bowl of soup or just simply for breakfast! So easy with only 3 steps, you've definitely got to make it your own!


Tuesday, October 1, 2013

Fried Prawn Begedil (Potato Patties)

This is a party hit when I invited my friends over to my place last week for lunch. Most stalls would cook begedil with beef but the prawn ones which my helper makes is so good that you would not want to eat the beef ones anymore.

Ingredients:
- potato
- vegetable oil for deep frying
- garlic powder
- flat leaf parsley (chopped finely)
- fried shallots (crushed finely)
- salt
- white pepper
- prawns (diced finely)
- egg yolk only

Steps:
1) Peel the potatoes and sliced them up to deep fry them till cook first
2) Mashed the potatoes very finely until soft thoroughly
3) Add the chopped flat leaf parsley, crushed fried shallots, garlic powder, salt and pepper, prawns in to the mashed potatoes
parsley and fried shallots in

The amount of garlic powder to add


Prawns added in
4) Mix well and finally, form them into balls and you can refrigerate it to store till you want to fry it. If not, just straight away rolls into balls and flatten them out with your palm to make a small patty.

5) Deep into egg yolk before deep frying them.

Fry till the colour is right!

Enjoy this wonderful snack!


Thursday, September 26, 2013

Creamy Au Gratin Potatoes

In the culinary arts, the term au gratin refers to a dish that is baked with a topping of seasoned breadcrumbs and cheese. The au gratin topping should be golden brown, which can be achieved by baking or by placing the dish under a broiler. 

This is one of my favourite ways of cooking as I just love crispy brown cheese at the sides of the dish!

Discovered this wonderful recipe which is not only easy but yummy as my son who does not really favour eating potatoes, ended up eating a lot of this!

Ingredients ( servings of 4)
- 4 russet potatoes (sliced thinly)
- 1/2 onion (sliced thinly in rings)
- butter (3 TB)
- plain flour (3 TB)
- milk (2 cups)
- shredded Cheddar Cheese (1 1/2 cups)
- salt and pepper to taste

Steps
1) Preheat oven to 190-200 degrees celcius
2) Lay 1/2 the sliced potatoes in the casserole dish
3) Then lay the sliced onions over it
4) After that, lay the rest of the potatoes over it. Season with salt and pepper


5) For the sauce, melt butter over medium heat in a saucepan
6) Mix in the flour and use a whisk to mix it
7) Add in the milk slowly and keep stirring. (Pressure point: Do not dump in the milk all at once just in case its too much and end up too watery)
8) Once the mixture has thickened, put in about 1 cup of cheddar cheese. 


9) Finally, pour the whole mixture into the casserole dish together with your potatoes and onions. You can see some whitish cream over my potatoes as I added my leftovers buttermilk. That's what I like about cooking, you can throw anything in just as long as the flavour goes together. Its fun!


10) Then I finally top it with more cheese.


11) Cover the dish with aluminium foil and put in oven for about 1h to 1h 30 mins

12) The final 30 mins, I remove the foil so as to have the golden colour from the cheese.

13) Garnish with spring onions after that!


Enjoy! Great side dish for a family dinner!


Thursday, September 12, 2013

Roasted Chicken with Vegetables

This dish is similar to a one pot meal as you simply put the ingredients together in roasting pan and throw it in the oven to do the cooking. So its easy and enjoyable for the whole family to dig in.

Ingredients (for 4)

- 1 whole chicken
- 2 sticks of butter
- 3 carrots
- one box of button mushrooms, cut in half
- 4-5 potatoes, cut in half
- dried rosemary
- dried thyme
- salt and pepper for seasoning
- chicken stock
- corn
- Optional: Zucchini, sliced

Steps

1) Preheat the oven to 240 degrees celcius
2) Wash the chicken thoroughly, especially inside the cavity area
3) Sprinkle salt and pepper generously on the chicken. Massage it. Add dried rosemary and thyme as well.
4) Rub one stick of butter all over the chicken, evenly coating it.
5) Cut up the vegetables. Roughly chopped. For the potatoes, you can also put in the oven together with the rest of the veggies. But I prefer my potatoes mashed. So I cooked them in boiling water and mash them with butter as a side. So, you see which you prefer. To oven cook it or mash it.
6) Put the chicken and cut up vegetables in the roasting pan. Distribute remaining butter evenly on top of the vegetables. When placing the chicken, place it on top of the vegetables.
7) Finally, I use about 3 cups of chicken stock and pour it into my large roasting pan so that the moisture can help cook the vegetables and make my chicken meat moist.
8) Then, put the roasting pan into the preheated oven. Once you put in. I turn it down to 200 degrees celcius. Put on the timer for about 30 mins for me to check on it. It should take about 30-45 mins depending on how big is your chicken and how crispy and dark colour you want your chicken to be.


This is the final outcome!


My children all helped in the cutting of vegetables and marinating of chicken. So it was a sense of accomplishment for them to see their effort on the table!

Here's my dinner plate. Added mashed potatoes topped with sour cream and spring onions (chives).

Everyone enjoyed it so much that there was no leftovers at all!


Monday, September 9, 2013

Grilled Shrimps with Pasta Salad

I have been a sucker for salads since about 3 months ago. I discovered the joy of eating them with my own homemade vinaigrette, rather than those bottled ones which can taste strange.

Below is the recipe for my grilled shrimps with pasta salad which I made to go with my steak. Simple and healthy!


Ingredients for 2:
- cherry tomatoes (sliced in halves or wholes. Your preference)
- cucumber (diced)
- fusilli pasta
- canned corn or you can use frozen/fresh corn
- shrimps (or we usually call it prawns here. I used tiger prawns. Bought it frozen and cheap from Foodie Market Place in Tiong Bahru)
- olive oil (3 TB)
- dijon mustard (1/2 TB)
- salt (1 tsp)
- 1/2 lemon/apple cider (1TB)

Steps
1) Cook the fusilli in boiling water with salt and put it aside to cool down. After sieving the water out, quickly wash it with running cold water so as to stop it from overcooking the pasta.

2) Mix the cucumber, cherry tomatoes and corn in a mixing bowl

3) In a small bowl, put olive oil, dijon mustard, salt and either lemon or apple cider to make it acidic and sour. Mix it well and dissolve the mustard

4) Set aside the dressing

5) I grilled my shrimps with my homemade garlic butter with herbs. I will teach you how to do it another time. If you dont have, you can just fry with minced garlic, put in some herbs or just season with salt.

6) Finally, assemble everything. Pour the dressing on top of the salad and mix it evenly. Then top it with the grilled shrimps.

This dish is great on its own for lunch or even as a side!

Enjoy!