Nuffnang Ads

Friday, September 27, 2013

Mee Soto (Chicken Noodle Soup)

This has been one of my favourite Malay food as its light and comforting. There's something about chicken soup that is so assuring..

Anyway, my helper happens to make a wonderful bowl of mee soto which I would love to share this with you.

Ingredients

Group A (paste)
- tumeric ginger (thumbsize)
- old ginger (thumbsize)
- lemon grass (just the bottom part)
- garlic (about 4 cloves)
- shallots (about 8)
- Sup/Soto Powder Packet


Group B (chilli)
- chilli padi (4-5 small ones)
- kecap manis
- garlic (4 cloves)

Group C
- bean sprouts
- coriander (finely chopped)
- yellow noodles or vermicelli
- fried shallots (you can either fry them yourself or just buy ready made crispy ones from the supermarket)
- whole chicken
-spring onions
- top part of lemon grass
- 4 eggs


Steps:
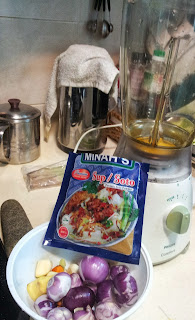
1) Blend the ingredients in Group A with a little water, except the powder.


2) After its more or less blended, you can put in 2 TB of the powder from the packet


3) Then take the paste to fry it in a little oil in the frying pan over medium heat.

4) Then put the whole chicken, spring onions about 2 bunch, the top part of the lemon grass and the fried paste in a big pot of water to cook.


5) Let it cook for about 30-45 mins for the chicken to cook through

6) At the mean time, you can blanch your bean sprouts, cook your eggs (make it hard boiled) and noodles in boiling water.

7) Then for the mee soto chilli, you use the Group B Ingredients and pound the chilli and garlic together first. Then finally, you just add the kecap manis sauce (2-3 TB).


8) Once your chicken is cooked, bring it out to cool it so that you can shred the chicken meat

9) Put everything together to prepare to serve


10) Finally, just add the soup to your noodles. Taste the soup before serving. Season with salt if you like.

 (By the way, pictures are from 2 various times I cooked. So as you can see, the below picture is vermicelli noodles instead of the thick yellow noodles. I very much prefer that as its lighter and healthier.)

Enjoy!


Thursday, September 26, 2013

Creamy Au Gratin Potatoes

In the culinary arts, the term au gratin refers to a dish that is baked with a topping of seasoned breadcrumbs and cheese. The au gratin topping should be golden brown, which can be achieved by baking or by placing the dish under a broiler. 

This is one of my favourite ways of cooking as I just love crispy brown cheese at the sides of the dish!

Discovered this wonderful recipe which is not only easy but yummy as my son who does not really favour eating potatoes, ended up eating a lot of this!

Ingredients ( servings of 4)
- 4 russet potatoes (sliced thinly)
- 1/2 onion (sliced thinly in rings)
- butter (3 TB)
- plain flour (3 TB)
- milk (2 cups)
- shredded Cheddar Cheese (1 1/2 cups)
- salt and pepper to taste

Steps
1) Preheat oven to 190-200 degrees celcius
2) Lay 1/2 the sliced potatoes in the casserole dish
3) Then lay the sliced onions over it
4) After that, lay the rest of the potatoes over it. Season with salt and pepper


5) For the sauce, melt butter over medium heat in a saucepan
6) Mix in the flour and use a whisk to mix it
7) Add in the milk slowly and keep stirring. (Pressure point: Do not dump in the milk all at once just in case its too much and end up too watery)
8) Once the mixture has thickened, put in about 1 cup of cheddar cheese. 


9) Finally, pour the whole mixture into the casserole dish together with your potatoes and onions. You can see some whitish cream over my potatoes as I added my leftovers buttermilk. That's what I like about cooking, you can throw anything in just as long as the flavour goes together. Its fun!


10) Then I finally top it with more cheese.


11) Cover the dish with aluminium foil and put in oven for about 1h to 1h 30 mins

12) The final 30 mins, I remove the foil so as to have the golden colour from the cheese.

13) Garnish with spring onions after that!


Enjoy! Great side dish for a family dinner!


Wednesday, September 25, 2013

Buttermilk Broccoli Soup

Just a couple of weeks ago, my regular Hypermarket which I visit for grocery shopping had an offer for broccoli. So I bought two whole ones and finally decided to make a soup out of it since its the easiest to make use of them without getting sick of eating broccoli.

And because I had leftover buttermilk from my fried chicken, I also decided to incorporate it into this dish.

It tasted so good and I would definitely cook this soup again as its easy and tasty!

Ingredients
- butter (3 TB)
- 1 onion (chopped)
- 4 celery stalks (chopped)
- chicken stock (3 cups)
- 2 whole broccoli (cut into small pieces so that it will cook faster)
- 2 cups of milk/buttermilk
- Salt and pepper to taste

Steps
1) Put the butter into the soup pot and start adding in the onions. Fry till fragrant and translucent.
2) Then throw in the celery and toss them around until tender


3) Add broccoli and the stock. Cover them completely with the stock/water. Let it cook and simmer for about 20 minutes. Add a pinch of salt.


4) Use a stick blender to blend everything in the pot. If not, you just need to transfer the soup into the blender.

5) See if you like the thickness of the soup. Surprisingly, when I checked mine, it was already quite ok. Not as watery as I thought it might be. So I did not add flour to my soup at all.

6) Add buttermilk to the pot only at the last minute of boiling before serving. The buttermilk thickens it up a little. Add salt and pepper to taste. If you prefer a thicker version of the soup, you can just add flour to your milk before pouring it in.

Very easy to make! Enjoy! Perfect with homemade garlic bread!


Monday, September 23, 2013

Buttermilk Fried Chicken

Just last week, I finally got down to my fried chicken experiment which I have been procrastinating in trying- buttermilk fried chicken versus KFC chicken. A while back, my friend posted a KFC chicken recipe in Facebook and challenged me to try.

Result: I preferred the buttermilk taste... as I am quite sure the KFC recipe being shared in Facebook was probably a spam since I doubt they will reveal their real recipe online.

Anyway, here's the buttermilk recipe

Ingredients
- buttermilk (enough to cover your chicken in a bag)
- salt (2 TB)
- freshly ground black pepper (1/2 tsp)
- dried rosemary herbs (1 tsp)
- 1/2 onion finely grated
- 2 cloves of garlic finely grated
- paprika (1/2 tsp)

Soak the above ingredients overnight in a bag together with your chicken


Steps
1) After soaking your chicken overnight with the above ingredients, you prepare a plate of all purpose flour/ plain flour, together with garlic powder  and onion powder (1 TB each) and paprika (1 tsp)

2) Remove the chicken from the buttermilk, pat dry it with paper towels, remove any herbs from the chicken and cover them with the seasoned flour.


3) Finally, just deep fry them with vegetable oil


Enjoy!


Friday, September 20, 2013

Stuffed Bean Curd Puffs- 2 ways

Now that I am a stay at home mum, I have been thinking of what to have for lunch with my helper at home. So yesterday, she said she had cravings for something she used to eat- Stuffed bean curd puffs. So I told her to make me some for me to try and it was refreshingly nice, simple and healthy!

Give it a try! Makes a great party snack!

Ingredients:
- cabbage (sliced thinly)
- bean sprouts
- carrots (sliced thinly)
- garlic (minced)
- flat leaf parsley (chopped finely)
- bean curd puffs


Steps:
1) Add some oil to the frying pan/wok. Throw in your garlic.
2) Add the sliced carrots before your garlic turns brown


3) Add your sliced cabbage and stir fry it
4) Then add bean sprouts
5) Season it with salt and soya sauce to your liking.


6) Finally, throw in the chopped flat leaf parsley and give it a few tosses before you off the fire.


7) The vegetables should be cooked but yet crunchy. (Pressure Point: Don't overcook it if not it becomes soggy and soft. Look at your bean sprouts for a good gauge. It should still be crunchy without having the raw taste)

8) Then remove the vegetables from your wok into a strainer and a bowl to collect the sauce. You can reuse the sauce for your other cooking since all the vegetable stock flavour is in there. Don't waste it!


9) Then, cut the tofu puffs by doing a slit on just one side of the square. Then you blanch the tofu puff with hot water for just 1-2 mins.


10) Finally, you stuff in the veggies!


This is the healthy version which I prefer!! As you feel so happy and guiltless eating this!

For the deep fried version, you basically pound the garlic, salt and black peppercorns (for some spice if you like)


Then add plain flour to a mixing bowl, together with one egg and some water enough to just dissolve the flour and throw in the pounded garlic,salt and pepper.


Then submerge it with your puffs and deep fry them!


Here's the outcome!


Enjoy!

Thursday, September 19, 2013

Beef Stew (lite version)

Stews are my favourite kind of dish as one dish encompasses everything- meat, carbo, veggies. Its not only healthy, tasty (even without adding much seasoning) but also comforting especially on a cold rainy night.

2 days ago, the weather was perfect for stew. So I took out my beef from the freezer to prepare for dinner tonight. I usually start preparing at about 2 pm. So that by 7 pm, the beef will be tender and the gravy will be awesome.

This recipe is what I consider, a "lite version" as I did not add tomato paste to this and the gravy is not thick. I usually like eating this with rice. For the tomato paste version, I like eating it with either pasta or bread. So, its really your preference. If you want your gravy to be thick, then you just add cornstarch to it.

Ingredients:
- Beef Chuck
- Carrots
- Celery
- Potatoes
- Onions
- Dried Herbs (Rosemary, Thyme)
- Garlic Powder
- Beef stock (Used the cube mix in hot water to dissolve first)
- Water
- Red Wine (Its optional but I prefer with red wine)

Steps:
1) In a large pot, add vegetable oil and cook the beef over medium heat until brown.


2) Remove it from the pot. Then, throw in the onions and scrape the sides from the browning of the beef to add to the onions. Fry until its fragrant and the onions are translucent.


3) Put in the carrots and potatoes in. I prefer to put my celery till the very last part as I like it a little crunchier. Up to you. You can throw in together with your carrots and potatoes if you like.

4) Then throw in your beef together and mix it around.


5) Pour the beef stock, water and red wine in to cover up all your ingredients.

6) Then add in the dried herbs and seasoning with salt and pepper.


7) Let it boil before turning down the fire to let it simmer. I left it to simmer for about 3-4 hours. Test to see if the beef is soft before turning it off. I would throw in the celery at this point.


8) Remember to always taste your food to see if you are happy with the flavours. If not, just add something to it to balance it up. 

9) Finally, I topped this up with my plate of rice with lots of soupy gravy.

Enjoy!


Tuesday, September 17, 2013

Guilt-free Crispy Ikan Bilis (anchovies)

My children simply loves anything crunchy and crispy- from crispy fish skin, chicken skin to fried ikan bilis. I have recently read a recipe online in noobcook blog and there was this crispy baked ikan bilis recipe which I had to try because I do not like to cook dishes with lots of oil. My helper usually fries the ikan bilis with lots of oil which I feel so sinful eating and seeing the oil go to waste like that.

So this recipe is simple, guilt-free and ends up with the same crunchy, crispy result. So why not?

Ingredients
- dried anchovies (the ones that are cut in halves already with the bones)

Steps
1) Wash the anchovies for two rounds to remove most of the salt content
2) Pat dry them and lay them out on the baking tray
3) Air dry it for about an hour
4) Preheat oven to 180 degrees Celsius
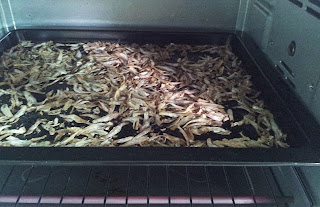
5) Place the baking try with ikan bilis inside for 10 mins

6) Take out the tray and use a spatula to just toss it around so that the ikan bilis get evenly browned on all sides
7) Turn up the oven to 200 degrees Celsius for just 5 more mins and it should be done! How brown you want it is simply up to you..

After that, I let it cool down for 10 mins before placing it into a zip lock bag which I eventually placed it in the airtight container.

Great compliment for your lunch or dinner!You can also pound this up into powder to make a soup base stock for your porridge or noodles as well. Very nutritious!

Enjoy!


Friday, September 13, 2013

Mee Goreng

This is a very comforting dish that my helper has made it to be. Though it is not very healthy, I enjoy having the various kinds of ingredients all coming together to make this dish so tasty!

Basically, this is yellow noodles cooked with sambal belachan. I have the steps to make sambal belachan in this blog.

So you basically fry this with minced garlic, onions, bean sprouts, prawns, squid, fishcake, noodles, spring onions (the top green ones) and sambal belachan. Then you can fry an egg as a side and sliced cucumber and tomatoes as well.

It is very easy. Great dish for breakfast or lunch!


Thursday, September 12, 2013

Roasted Chicken with Vegetables

This dish is similar to a one pot meal as you simply put the ingredients together in roasting pan and throw it in the oven to do the cooking. So its easy and enjoyable for the whole family to dig in.

Ingredients (for 4)

- 1 whole chicken
- 2 sticks of butter
- 3 carrots
- one box of button mushrooms, cut in half
- 4-5 potatoes, cut in half
- dried rosemary
- dried thyme
- salt and pepper for seasoning
- chicken stock
- corn
- Optional: Zucchini, sliced

Steps

1) Preheat the oven to 240 degrees celcius
2) Wash the chicken thoroughly, especially inside the cavity area
3) Sprinkle salt and pepper generously on the chicken. Massage it. Add dried rosemary and thyme as well.
4) Rub one stick of butter all over the chicken, evenly coating it.
5) Cut up the vegetables. Roughly chopped. For the potatoes, you can also put in the oven together with the rest of the veggies. But I prefer my potatoes mashed. So I cooked them in boiling water and mash them with butter as a side. So, you see which you prefer. To oven cook it or mash it.
6) Put the chicken and cut up vegetables in the roasting pan. Distribute remaining butter evenly on top of the vegetables. When placing the chicken, place it on top of the vegetables.
7) Finally, I use about 3 cups of chicken stock and pour it into my large roasting pan so that the moisture can help cook the vegetables and make my chicken meat moist.
8) Then, put the roasting pan into the preheated oven. Once you put in. I turn it down to 200 degrees celcius. Put on the timer for about 30 mins for me to check on it. It should take about 30-45 mins depending on how big is your chicken and how crispy and dark colour you want your chicken to be.


This is the final outcome!


My children all helped in the cutting of vegetables and marinating of chicken. So it was a sense of accomplishment for them to see their effort on the table!

Here's my dinner plate. Added mashed potatoes topped with sour cream and spring onions (chives).

Everyone enjoyed it so much that there was no leftovers at all!


Monday, September 9, 2013

Grilled Shrimps with Pasta Salad

I have been a sucker for salads since about 3 months ago. I discovered the joy of eating them with my own homemade vinaigrette, rather than those bottled ones which can taste strange.

Below is the recipe for my grilled shrimps with pasta salad which I made to go with my steak. Simple and healthy!


Ingredients for 2:
- cherry tomatoes (sliced in halves or wholes. Your preference)
- cucumber (diced)
- fusilli pasta
- canned corn or you can use frozen/fresh corn
- shrimps (or we usually call it prawns here. I used tiger prawns. Bought it frozen and cheap from Foodie Market Place in Tiong Bahru)
- olive oil (3 TB)
- dijon mustard (1/2 TB)
- salt (1 tsp)
- 1/2 lemon/apple cider (1TB)

Steps
1) Cook the fusilli in boiling water with salt and put it aside to cool down. After sieving the water out, quickly wash it with running cold water so as to stop it from overcooking the pasta.

2) Mix the cucumber, cherry tomatoes and corn in a mixing bowl

3) In a small bowl, put olive oil, dijon mustard, salt and either lemon or apple cider to make it acidic and sour. Mix it well and dissolve the mustard

4) Set aside the dressing

5) I grilled my shrimps with my homemade garlic butter with herbs. I will teach you how to do it another time. If you dont have, you can just fry with minced garlic, put in some herbs or just season with salt.

6) Finally, assemble everything. Pour the dressing on top of the salad and mix it evenly. Then top it with the grilled shrimps.

This dish is great on its own for lunch or even as a side!

Enjoy!


Friday, September 6, 2013

Glutinous Rice (糯米饭) -Easy Method

I have always loved and cooked dishes numerous times as long as they are easy to prepare and tasty to eat! Cooking glutinous rice is one of those dishes. It is basically like a one-pot meal where you simple throw everything in, go and do your stuff and just come back when its about time to eat!

Here's the ingredients you need:
- dried shrimps (soaked in water. Reserve the water)
- dried mushrooms (soaked in water, then sliced. Reserve the water)
- finely sliced shallots (about 3-4)
- 2 cans of braised peanuts
- glutinous rice (soaked)


Steps:
1) Pour a little oil into the hot frying pan
2) Add the shallots and stir fry till its translucent or when you can smell the fragrance
3) Add the dried shrimps. Stir fry till its fragrant
4) Add the dried sliced mushrooms
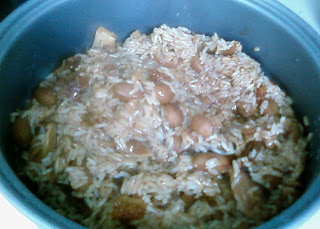
5) Pour in the glutinous rice and braised peanuts, together with the gravy from the can. Keep tossing and stirring
6) Then add a little soya sauce, dark soya sauce. No need sugar as the gravy from the peanuts is sweet already.
7) Then after frying it up, you transfer into the rice cooker. The traditional method is to steam it, but I prefer the simple method where I don't have to worry about the water drying up in my wok.
8) Cover the rice with water from the dried mushrooms and shrimps. Use the same amount of water you use to cook normal rice.


9) It should take about 30-40 mins to cook.
10) Finally you can garnish with fried shallots and spring onions.

Variation:
- you can add slice pork belly or chinese sausage in as well. Throw it after you fry your shallots.

My whole family all love this simple and tasty meal!

Enjoy!