Nuffnang Ads

Friday, October 23, 2015

Thai basil chicken recipe (pad kra pao gai)

This is a very simple, yet tasty dish as the main time is spent cooking the chicken. Frying the egg and laying out the cucumber won't use up much of your precious time.

My whole family loved this. I omitted the chilli padi for my children. So I cooked in two batches.

Enjoy with your whole family!

Ingredients
- boneless chicken thigh/ breast meat
- thai basil
- chilli padi
- garlic
- fish sauce
- sugar
- dark soya sauce
- egg
- cucumber
- oyster sauce

Steps
1) Fry the egg with lots of oil. Must be really hot so that its a deep fried egg but make sure you don't overcook it so that the yolk will still be runny. Set it aside.

2) Pound the garlic with the chilli padi (for spicyness). If you are cooking for your children, then just pound the garlic.

3) Put in the pounded garlic and chilli into the oil in your hot wok. Keep stirring. put the chicken in and put the fish sauce, oyster sauce, dark sauce, and sugar into it. Finally, off the fire and throw in the basil leaves and still continue to stir in the hot wok.

4) Finally, serve over rice and put your egg in as well as slices of cucumber. Enjoy!


Thursday, May 7, 2015

Easy and tasty Chicken Macaroni Soup

Was inspired by cooking this from my church food volunteers who prepares breakfast for all the helpers for that week. When I tasted it, I just knew I had to cook it because its so comforting, especially during a cold and rainy day.

Hope you will enjoy this dish as much as I do..

Ingredients
- all 3 types of carrot (orange, white and green- 1 each.) Picture below just in case you are not sure what I am talking about. The normal orange carrot probably needs no introduction.


- 1 whole chicken
- 1 big onion - diced
- spring onions (optional, garnish)
- fried shallots (optional, garnish)
- 2 slices of ginger
- few pieces of garlic
- macaroni

Steps
1) Diced up all the carrots into small squares
2) Add water to the pot. Have a pot big enough to have the whole chicken in. Add enough water to cover the chicken.
3) Throw in everything- onions, all the carrots, ginger and garlic and boil
4) Once the water is boiling hot, put the whole chicken in
5) Let it cook and boil
6) After about 20-30 mins, check the chicken to see if cook. Once its ok, I would bring it out and when cool down, I would shred the chicken meat and debone it and throw the bones back into the soup to continue boiling.
7) Boil until the veggies are soft enough and you add salt, soya sauce to taste. Most of the time, I don't add as its tasty and sweet on its own already.
8) Cook the macaroni separately in another pot
9) To serve, just add the cooked macaroni, topped with chicken meat and pour the soup with veggies over.
10) Can garnish with spring onions, fried shallots and slices of chilli padi if you like

Simple, nutritious and good for the soul!


Easy-bake Lasagna

Making Lasagna is quite simple. The main ingredient is getting the tomato, beef mixture right. Its a bit like cooking pasta and adding the sauce over, but just one more step to it - adding the cheese.

Ingredients (for 4-5 people)
- minced beef ( I bought 2 packets frozen from supermarket). You can substitute with minced chicken/pork if you don't eat beef.
- 2 cans of whole/chopped tomatoes
- 2 cans (6 oz) of tomato paste
- finely diced big onion (1-2 depending on your preference)
- minced garlic
- mozzarella cheese and cheddar cheese (About 2-3 packets of cheese in total)
- dried basil
- dried parsley
- dried oregano
- carrots (optional)
- bell pepper (optional)
- one box of instant oven-ready lasagna sheets

Tray for 2 people
Tray for more people


Steps
1) Put oil into pot and fry the onions , carrots and bell peppers. The carrots and bell peppers are optional as it depends on your preference. If you want your family to have some greens, but they may not like it, I suggest, finely dicing it..so fine that they wont even notice its there.

2) Once the onions is translucent, you can add the minced garlic and beef. I add the garlic late because I do not want the garlic to burn as it gets black easily.

3) After tossing and frying the beef for a short while, throw in the canned tomatoes and paste all in.

4) Add in the dried herbs...about one teaspoon each. Add salt, sugar and black pepper to taste.

5) Don't try to save on the paste until you add a can full of water.. For spaghetti, you can do that. But for Lasagna, you want to keep the paste as dry as you can. So just use your spoon to scrap as much from the cans and don't add extra water at all as the canned tomatoes have water in them already

6) Let it simmer until the whole thing is thick and does not have so much water/juice.

7) Once the main stuff is taken care of, you go prepare the rest

8) Get ready your tray and spray with oil first at the base.

9) Put the lasagna sheets in the tray. Lay all on the base.

10) Scoop the tomato beef mixture onto the sheets, covering all of it
11) Then put the cheese on top of the tomato beef mixture.

12) Then repeat the process by putting the lasagna sheets on top of the cheese.

13) So the order is basically lasagna sheets---tomato beef mixture---- cheese

14) You create about 4 layers if possible, ending off with the cheese on top

15) Put into the preheated over at about 180C for about 20-30 mins.

16) Check at about 15-20 mins to see if the cheese is brown. If it is, I suggest putting a piece of aluminium foil over the tray just to cover it, preventing the top from becoming burnt.

Enjoy!


Wednesday, November 19, 2014

Special Bee Tai Mak

Had this once at my friend's house and loved it so much that I had to replicate it on my own. Cooked twice so far for my family and for my cell group and they all loved it! This dish is easy to cook but the difficulty is on the preparation. So what I do is to prepare what I can prepare first so that on that day itself, I do not have to rush.

Ingredients
- Minced pork
- Diced liver
- Minced garlic
- Chopped Coriander
- Sliced chilli padi
- Bean Sprouts
- Bee Tai Mak
- Lime
- Small Prawns (Bought this frozen from supermarket)

What you can prepare ahead
- Minced garlic
- Marinate pork
- Marinate liver
- Sliced chilli padi
- Squeeze lime

I know most people would squirm at the sight or mention of liver. But it is a good element to add as I feel it adds a good twist, richness and depth to the flavour profile of the dish. Anyway, this special dish is self-served. So leave it to your guests or family to choose what they like to add to their plate.

Steps
1) Minced garlic and fry it in pan. Put just enough oil to cover the garlic. Cook in low fire and stir continuously so that it won't brown up unevenly.


2) After the garlic turned golden brown, quickly off the fire, drained the oil and spread the fried garlic on a paper towel to cool down. Once cooled, put in airtight container and leave in fridge.

3) Squeeze the bag of lime with a sieve through to a glass bottle to store in fridge. Set aside

4) Marinate the minced pork with soya sauce, sugar, salt and dark sauce

5) Marinate the chopped up liver with oyster sauce, soya sauce, fish sauce, dark sauce

6) Sliced the chilli padi thinly, removing the seeds

7) Peel the bean sprouts. For it to look nice, you can remove the front and back of it. Blanch it in hot water.


8) Chopped up the coriander

9) Blanch the frozen 'cocktail' prawns

10) Boil the bee tai mak, strain it and set aside. Don't overcook it.

(The above steps can be done in any order)

11) I used the leftover garlic oil to cook the minced pork and liver. Add the marinated pork to the frying pan with oil. Add water to dissolve the pork so that it do not clump together. Finally add flour with water to thicken the gravy.

12) Fry up the liver. I actually added few slices of ginger and spring onions for the taste of liver. So that the smell and taste of liver is not that strong. Up to you. Taste it. Adjust it according to your preference.

In the end, just serve everything separately for the guests to add. Just remember that there are 9 components to this dish, just in case you accidentally left out something or forgot to bring.

It should look like this! (With a few teaspoons of lime in it!)


Then, tell your guests to mix it up properly!


Frankly speaking, this is a very well-balanced dish with spice, sour, salt, sweet. Texturally it is also perfect with the crunch from the fried garlic, prawns and bean sprouts!

Enjoy this unique dish! Do give me any comments once you have tried it!

Monday, September 8, 2014

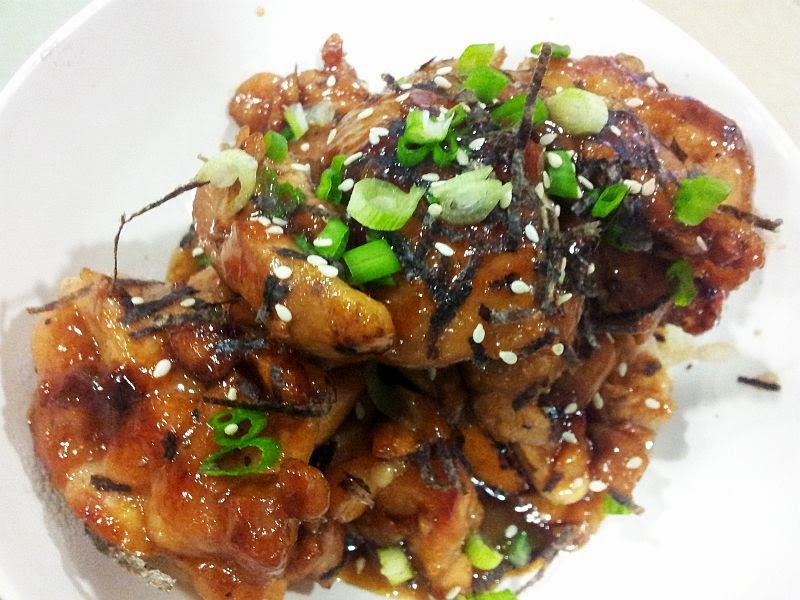
Simple Teriyaki Chicken

This is a simple, yet tasty recipe for the whole family. Each time I cooked this, my children simply asks for more servings. You will regret it if you do not cook this dish for your family. It is so easy!

Ingredients
- light soya sauce (4 TB)
- mirin (4 TB)
- Sake (2 TB)
- Sugar (1 TB)
- Boneless chicken thigh or chicken leg (do not remove the skin)
- For garnish, spring onions, shredded seaweed (get from supermarket Jap section), white sesame seeds

* You can now easily get mirin from supermarkets under the Japanese section. As for Sake, I did not buy as it is an ingredient which I seldom use in my cooking. So I replaced that with Chinese xo wine which I have. I am guessing any cooking wine also can.

Steps
1) Mix the first 4 ingredients in a bowl and set aside.
2) Marinate the chicken with salt and black pepper for at least 30 mins
3) use a flat pan, no need oil, place the chicken in the pan with the skin face down, pan fried for about 3 mins till abit golden in colour( medium heat )
4) Add the mixed teriyaki sauce to the pan and allow the chicken to simmer till the sauce is dry (low heat)
5) Keep turning the chicken so that both sides will absorb the sauce
6) Remove from pan once the chicken is cooked and nicely browned.
7) Finally top up with spring onions, shredded seaweed and white sesame seeds

Best served with rice!

Enjoy!

Friday, August 29, 2014

Light Japanese Soufflé Cheesecake

Baking has always been my weakness as it involves accuracy and many steps, not to forget the horrible washing after all the mixing bowls used. Nevertheless, with all the time I have in the day as well as to hone my baking skills, I knew I should do it! Anyway, its a great way to save money when a family member celebrates their birthday as cakes can be really expensive!

Anyway, decided to cook this after eating a really nice chiffon orange cake baked by my aunt-in-law. However, changed it to cheesecake because my children simply loves cheese!!

This is a great recipe as its light and fluffy!

Enjoy!

Ingredients (for 9 x 9 x 2 inch square tray):

160 ml milk
80 g butter, at (tropical) room temperature, cut into small pieces
280 g full-fat cream cheese block, at (tropical) room temperature, cut into small pieces
100 g cake flour, sifted
30 g cornstarch, sifted (if you have corn flour instead, use twice the amount (60g)
1/4 tsp salt
140g egg yolks
 4 tsp lemon juice

 350 g egg whites
 150 g caster sugar


The eggs should amount to about 8-10 eggs depending on size.

Steps:

1) Spray the baking tray with oil/butter, then place baking paper on it.
2) Wrap the sides of tray with aluminium foil
3) Heat milk till warm. Then, place the milk in a mixing bowl, together with the small pieces of butter and cream cheese. Mix it evenly.
4) Add the egg yolks and lemon juice into the mixture of cream cheese.
5) Sieve the mixture twice or more to make it very smooth
6) Place the sifted flour (both cake and corn flour) as well as salt into the cream cheese mixture.
7) Mix it really well and even.
8)Preheat the oven to 180 degrees C
9) Mix the egg whites with a mixer till it creates soft peaks. While mixing, add in the sugar gradually.
10) Fold gently in the egg whites to the yolk mixture in 3 rounds. Get rid of big air bubbles.
11) Pour batter into the tray slowly to avoid creating bubbles
12) Put hot water on a big rectangle tray, then place the square tray in to act as a water bath during baking to keep the cake moist.
13) Place the tray into the oven and bake it at 170 degrees C for about 50-60 mins.
14) Test it with a skewer to see if its ready.
15) Remove cake from oven and cool it on a rack

Enjoy!


Wednesday, August 6, 2014

Claypot Braised Pork Belly with Salted Fish

My friend shared this recipe with me as I have been looking for dishes that goes well with rice so that I can just prepare a dish or two just for dinner. Simple and tasty is my goal in cooking. Simplicity takes away the stress of washing up!

So here's a great dish for the family to dig in. You can just boil vegetables like cai xin or Xiao bai cai as a side dish with the rice.

Enjoy!

Ingredients
- pork belly (500g)
- salted fish- the oily ones you use for steaming (50g)
- 2 large onion (Initially, I was sceptical in using so many but its worth it! Sweeten up the dish)
- pepper
- ginger (cut)
- shallots (cut)

Marinade for the pork belly
- 1TB oyster sauce
- 1 TB light soya sauce
- I TB dark soya sauce
- 1 cornstarch

(I didn't have enough pork belly in my fridge, so I added minced pork as well)

Seasoning
- 1 TB oyster sauce
- 1 TB light soya sauce
- I TB dark soya sauce
- 150 ml water
- 1 tsp sugar
- 1 tsp sesame oil

Steps
1) Marinade the pork belly for at least 30 mins and place it in the fridge
2) Heat wok, drizzle some oil. Pan fry the pork belly both sides till brown. Set aside
3) Add a little of oil and put salted fish in claypot and fry for a while
4) Add the ginger, onions and shallots and sauté till fragrant
5) Add pork belly and seasonings, then pour water and simmer for 15-20 mins or till slightly dry. I did not wait till its dry as I love mine with gravy for the rice. Your preference!

Serve with rice and veggies!