This dish has been my son's favourite. He simply loves glutinous rice. So decided to make him this. Be warned that the ones sold in shops are really oily. So don't expect that when you make it at home. This is a healthier version since you get to choose what kind of chicken part you want and how much seasoning to add. It is basically quite a straight forward dish to prepare. Have fun!
What you need
- Chicken fillet / De-boned Chicken thigh
- small aluminium trays to put it in
- glutinous rice
- chicken stock
- dried mushrooms/ Chinese sausage (optional)
Marinade the chicken
- sesame oil
- soya sauce
- oyster sauce
- corn flour
- white pepper
Seasoning water for rice just before steaming
- sesame oil
- light soya sauce
- salt
- chicken stock
- water
Steps
1) Rinse and soak the glutinous rice for at least 2 hours
2) Slice the chicken and marinade it
3) After soaking the rice, discard the water
4) Layer the chicken (and dried mushrooms/Chinese sausage) inside the tray first as the first layer
5) For the next layer, cover the tray with rice, packing it tightly
6) Put the seasoning water in the tray till it covers the rice
7) Finally steam it
If you find the chicken dry, I suggest you either use chicken thigh (since it is more tolerant to heat) or steam the glutinous rice first before you assemble into the tray
Some recipes soak the glutinous rice overnight together with the seasoning water in it already. I haven't tried that but I can imagine the rice to be darker in colour and more tasty.
Anyway, just grasp the main idea and tweak it to whatever suits you and how much time you have!
Enjoy!
Nuffnang Ads
Tuesday, July 22, 2014
Wednesday, May 21, 2014
Freshly Made Pasta Sauce
I was first inspired to make my own pasta sauce when I had dinner over my friend's place. I have never felt so good after eating before (even after eating so much). Because it was healthy and clean food with no processed meats or preservatives (even though we had homemade pizza and fried and chips for dinner with homemade pasta sauce for the pizza base, fresh fish just caught, homemade chips from potatoes, and the best batter I have ever tasted which was light and crisp!). My friend even used chicken breasts for the pizza instead of the usual sausages,pepperoni or ham.
Since that dinner, I am utterly convinced that eating healthy can be tasty and it makes you feel good! So, I have drastically cut down on any canned food or processed meats since then and also after watching this video!
Making your own pasta sauce is so "easy peasy lemon squeezy" (I learnt this phrase from my children) that you just have to make it. There are no excuses not to. Its not only healthy, fragrant, tastier, much cheaper and its simple to make! (By the way, cost price for this sauce is about $2! )
Here's the ingredients (all roughly chopped)
- 3 large tomatoes
- one large yellow onion
- about 5 garlic cloves
- olive oil
- salt and sugar to taste
- dried herbs (I used basil)
- flour to thicken if you like
Basically, the fun thing about making your own sauce is that you can mix and match. So basically add whatever you like in your pasta sauce and throw all in a blender! I will probably throw in mushrooms next time!
Steps:
1) Throw the chopped up tomatoes, onions, garlic and a bit of olive oil all in a blender and start blending!
2) After blending, put salt and sugar to taste and dried herbs.
Don't worry if it tastes spicy from the onions. Initially, I was also worried as I am sure my children wouldn't like it but I realised that after cooking the sauce, the 'spiciness' from onions just goes away and becomes sweet thus making the sauce so much yummier! So don't be afraid to add the whole onion in!
3) Heat a pot and throw in the sauce to cook it. If you want to use this sauce for spaghetti/baked pasta, I added minced beef first. Fry it up a little before throwing in the sauce. Cook until boiling or when you feel the taste and fragrance is out!
4) You can add flour to thicken the sauce if you like. But I feel its not necessary as if you are doing baked pasta, the oven will make the sauce disappear into the pasta.
Then, you are DONE! Easy yah? I am sure you can do this! To be honest, the sauce reminds me of the escargot herb garlic butter which I SOOO missed! That's probably why I am in love with this sauce.
As you can see the colour is not those dark red ones you find in the cans or bottles sold in supermarkets. That means how much preservatives they must have added to the pasta sauce as if its freshly made, it should be orange in colour. So that really scared me and convinced me that all the more, I should start preparing it fresh!
I used the sauce for baked pasta as me and my children loves melted cheese with the crispy bits at the sides!
Since that dinner, I am utterly convinced that eating healthy can be tasty and it makes you feel good! So, I have drastically cut down on any canned food or processed meats since then and also after watching this video!
Making your own pasta sauce is so "easy peasy lemon squeezy" (I learnt this phrase from my children) that you just have to make it. There are no excuses not to. Its not only healthy, fragrant, tastier, much cheaper and its simple to make! (By the way, cost price for this sauce is about $2! )
Here's the ingredients (all roughly chopped)
- 3 large tomatoes
- one large yellow onion
- about 5 garlic cloves
- olive oil
- salt and sugar to taste
- dried herbs (I used basil)
- flour to thicken if you like
Basically, the fun thing about making your own sauce is that you can mix and match. So basically add whatever you like in your pasta sauce and throw all in a blender! I will probably throw in mushrooms next time!
Steps:
1) Throw the chopped up tomatoes, onions, garlic and a bit of olive oil all in a blender and start blending!
2) After blending, put salt and sugar to taste and dried herbs.
Don't worry if it tastes spicy from the onions. Initially, I was also worried as I am sure my children wouldn't like it but I realised that after cooking the sauce, the 'spiciness' from onions just goes away and becomes sweet thus making the sauce so much yummier! So don't be afraid to add the whole onion in!
3) Heat a pot and throw in the sauce to cook it. If you want to use this sauce for spaghetti/baked pasta, I added minced beef first. Fry it up a little before throwing in the sauce. Cook until boiling or when you feel the taste and fragrance is out!
4) You can add flour to thicken the sauce if you like. But I feel its not necessary as if you are doing baked pasta, the oven will make the sauce disappear into the pasta.
Then, you are DONE! Easy yah? I am sure you can do this! To be honest, the sauce reminds me of the escargot herb garlic butter which I SOOO missed! That's probably why I am in love with this sauce.
As you can see the colour is not those dark red ones you find in the cans or bottles sold in supermarkets. That means how much preservatives they must have added to the pasta sauce as if its freshly made, it should be orange in colour. So that really scared me and convinced me that all the more, I should start preparing it fresh!
I used the sauce for baked pasta as me and my children loves melted cheese with the crispy bits at the sides!
Friday, May 16, 2014
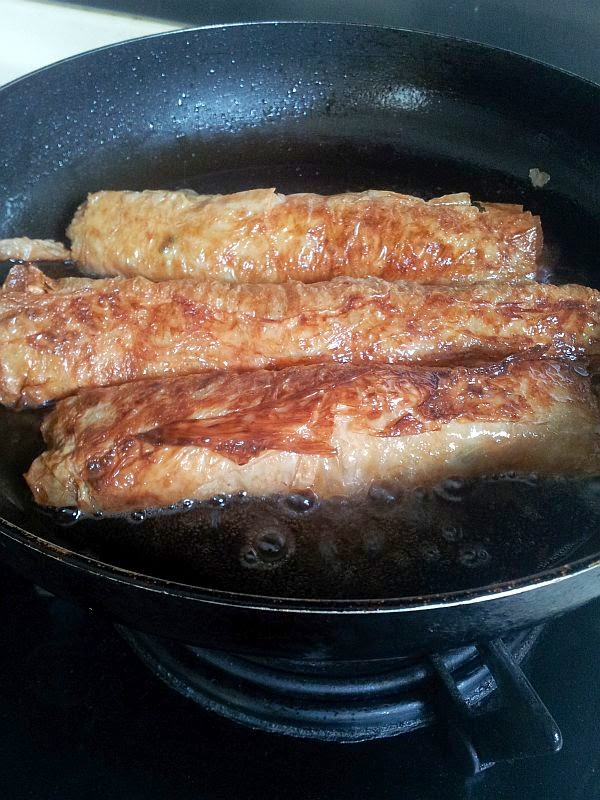
Ngor Hiang- Sweet and Juicy
This was my virgin try on preparing ngor hiang and it was a success, except maybe for the art in wrapping it which I have yet to master.
Decided to cook this as my hubby loves eating ngor hiang. I guess it is probably his comfort food since growing up with it as he is a hokkien and his mum cooks that a lot!
This recipe was shared by my facebook home cooking group which I joined. Enjoy!
Ingredients
- 1 kg of minced meat
- 300g of water chestnut
- 1/2 kg of prawns
- 2 big onions
- $2 worth of fish paste
- bean curd skin (the soft ones)
- 1 egg
Steps
1) Use a damp cloth to clean the bean curd sheets if not it will be very very salty
2) Steam the bean curd skin by covering with the cloth so that the water doesn't drop onto the sheets
3) Prepare the paste - minced the prawns, onions, and water chestnut. Add the minced meat and fish paste. Crack and egg and mix it altogether. Season with pepper and corn flour. (no need salt as the skin is salty already!) I added spring onions to give the colour and because I had it in my fridge and didn't know how else to use it before it withers beyond its of use.
4) Wrap the paste with the bean curd skin
5) After wrapping all up, deep fry them and voila, nice and crispy sides to go with for your lunch or dinner!
Decided to cook this as my hubby loves eating ngor hiang. I guess it is probably his comfort food since growing up with it as he is a hokkien and his mum cooks that a lot!
This recipe was shared by my facebook home cooking group which I joined. Enjoy!
![]() |
| Picture adapted from the Facebook Cooking Group |
Ingredients
- 1 kg of minced meat
- 300g of water chestnut
- 1/2 kg of prawns
- 2 big onions
- $2 worth of fish paste
- bean curd skin (the soft ones)
- 1 egg
Steps
1) Use a damp cloth to clean the bean curd sheets if not it will be very very salty
2) Steam the bean curd skin by covering with the cloth so that the water doesn't drop onto the sheets
3) Prepare the paste - minced the prawns, onions, and water chestnut. Add the minced meat and fish paste. Crack and egg and mix it altogether. Season with pepper and corn flour. (no need salt as the skin is salty already!) I added spring onions to give the colour and because I had it in my fridge and didn't know how else to use it before it withers beyond its of use.
4) Wrap the paste with the bean curd skin
5) After wrapping all up, deep fry them and voila, nice and crispy sides to go with for your lunch or dinner!
Saturday, May 3, 2014
Bacon-Nutella Puff Pastry
When my friend, Esther first posted this dish in Facebook, immediately I thought," What a brilliant idea to add nutella to bacon!" (As I know it will surely go well) The saltiness of the pork compliments well with the sweetness of the nutella and who doesn't like nutella??
I know of recipes like bak ku teh (herbal pork rib soup-local dish) with chocolate risotto suggested by a British Michelin star chef.
Anyway, here's the recipe which Esther shared with me! It is easy and make a great snack for bacon and nutella lovers!
Ingredients
- frozen puff pastry. Leave in overnight in fridge to defrost or leave it out at room temp till soft
- nutella
- bacon (fried in small strips)
- 1 egg
- sea salt
- cinnamon powder
Steps
1) Fry the bacon till the way you like it. I like mine crispy
2) Roll out the puff pastry till thin
3) Cut them into rectangles with a sharp knife. Depends on how big you want your pastry to be. I like it bite-sized. So its entirely up to you!
8) After all done, put in over at 200C for about 10-15 mins or when it turns brown.
Enjoy!
I know of recipes like bak ku teh (herbal pork rib soup-local dish) with chocolate risotto suggested by a British Michelin star chef.
Anyway, here's the recipe which Esther shared with me! It is easy and make a great snack for bacon and nutella lovers!
Ingredients
- frozen puff pastry. Leave in overnight in fridge to defrost or leave it out at room temp till soft
- nutella
- bacon (fried in small strips)
- 1 egg
- sea salt
- cinnamon powder
Steps
1) Fry the bacon till the way you like it. I like mine crispy
2) Roll out the puff pastry till thin
4) Lay out the bacon (about 2 pieces each) into the pastry
5) Add a dollop of nutella onto the bacon
6) Sprinkle sea salt and cinnamon powder on it
7) Seal it with egg and use the fork to surround it with the pattern lines. Then use your fork to poke holes on it
8) After all done, put in over at 200C for about 10-15 mins or when it turns brown.
Enjoy!
Wednesday, April 23, 2014
Seafood Mui Fan 海鲜烩饭 (Asian Stew with rice)
There are times I crave for this as its simple, tasty and comforting to eat. To me, this dish is like a stew which goes well with rice or noodles. I simply love stews!! Perfect for rainy weathers.
So if you are new to cooking, try cooking stews first as it is basically 'throw-everything-in' kind of dish. It is also easy to wash up too!
Anyway, here's the ingredients
- garlic
- fish cake
- pork slices/Chicken diced/fish slices (marinate with , soya sauce, salt and pepper)
(I omitted it this time round as I cooked a pork belly dish separate)
- Squid
- prawns
- Any leafy vegetable / cabbage
- egg
- cooked rice
- Chicken stock
- white pepper
- soya sauce
- crab meat (optional)
- carrots ( I didn't add as I figured it was enough dishes)
- corn flour
By the way, I use the concentrated chicken stock as just one drop and it gives so much flavour already. Can last very long as I leave the bottle in the fridge and take it up in times like this.
Basically, work with whatever you have in your fridge and would like to add in your dish. I didn't have any cai xin at that time when I cooked this, so I used cabbage by slicing it thinly.
Steps
1) Prepare (Wash and Cut up) all your ingredients separately
2) Add oil to your wok, very high fire
3) throw in the garlic and fish cakes. Toss
4) Put in the meat at this point
5) Throw in the veggies (As you can see, you are basically throwing things in one by one starting from the one that cooks longer first or wont make a difference if 'overcook')
6) Add soya sauce and toss
7) Add water to cover the food in the wok and stock. Close up the cover
8) Throw in the fish/prawns/squid last as those cook very fast
9) Have a bowl of water and corn flour ready to throw in to thicken it slightly (your preference to how thick you want your gravy to be)
10) Always taste to see if you are satisfied with it. Balance with whatever sauce you need. It may be more taste. So you add stock or even oyster sauce if you like.
11) Finally, throw in the beaten egg and swirl it one time before switching off the fire
You pour the gravy over the rice/ noodles and sprinkle some white pepper! Enjoy!
So if you are new to cooking, try cooking stews first as it is basically 'throw-everything-in' kind of dish. It is also easy to wash up too!
Anyway, here's the ingredients
- garlic
- fish cake
- pork slices/Chicken diced/fish slices (marinate with , soya sauce, salt and pepper)
(I omitted it this time round as I cooked a pork belly dish separate)
- Squid
- prawns
- Any leafy vegetable / cabbage
- egg
- cooked rice
- Chicken stock
- white pepper
- soya sauce
- crab meat (optional)
- carrots ( I didn't add as I figured it was enough dishes)
- corn flour
By the way, I use the concentrated chicken stock as just one drop and it gives so much flavour already. Can last very long as I leave the bottle in the fridge and take it up in times like this.
Basically, work with whatever you have in your fridge and would like to add in your dish. I didn't have any cai xin at that time when I cooked this, so I used cabbage by slicing it thinly.
Steps
1) Prepare (Wash and Cut up) all your ingredients separately
2) Add oil to your wok, very high fire
3) throw in the garlic and fish cakes. Toss
4) Put in the meat at this point
5) Throw in the veggies (As you can see, you are basically throwing things in one by one starting from the one that cooks longer first or wont make a difference if 'overcook')
6) Add soya sauce and toss
7) Add water to cover the food in the wok and stock. Close up the cover
8) Throw in the fish/prawns/squid last as those cook very fast
9) Have a bowl of water and corn flour ready to throw in to thicken it slightly (your preference to how thick you want your gravy to be)
10) Always taste to see if you are satisfied with it. Balance with whatever sauce you need. It may be more taste. So you add stock or even oyster sauce if you like.
11) Finally, throw in the beaten egg and swirl it one time before switching off the fire
You pour the gravy over the rice/ noodles and sprinkle some white pepper! Enjoy!
Thursday, April 17, 2014
Una-Tama (Grilled Unagi Eel and Egg)
I have always been a big fan of Japanese food. There is so much variety that somehow, I will not get sick of eating. The only thing holding me back from eating it everyday is of course, the COST! Its so expensive to eat in Japanese restaurants. The usual one I would go to is within walking distance from my house which has a lunch promotion for only $10 which includes a main dish, a side, and a dessert.
Even the non-promotional items are cheaper than regular restaurants. So that's where I go to for my Japanese food cravings.
Anyway, I bought unagi (grilled eel) from Giant hypermart as it was on offer.
So because of that, I decided to try a dish which is sold in Japanese restaurants in Singapore. If you have difficulty in finding grilled eel, you can substitute it with salmon (cut into cubes).
Ingredients
- Grilled Eel (small pieces)
- Yellow Onion
- Eggs
- Unagi/Teriyaki Sweet Sauce - Available in supermarkets in the Japanese section
- Seaweed and Spring Onions for garnish
Steps
1) Add oil to the pan. I used my happy call pan for the grill effect. But of course, any frying pan will do. Throw in the onions.
2) Toss it and add a bit of the unagi sauce to the onions to sweeten and caramelised it up.
3) Then throw in the eel and toss it. Add more sauce if you like it.
4) Finally, throw in the beaten eggs to let it cover all the eel and onions. I do not like my eggs to be overcooked but slightly mushy. It's nicer.
5) Remove from pan neatly and garnish with spring onions and seaweed (I used my ready cut up seaweed from a packet)
This dish is great with rice! You can actually place this on top of the rice. You can also make miso soup to go with this meal.
Enjoy!
Even the non-promotional items are cheaper than regular restaurants. So that's where I go to for my Japanese food cravings.
Anyway, I bought unagi (grilled eel) from Giant hypermart as it was on offer.
So because of that, I decided to try a dish which is sold in Japanese restaurants in Singapore. If you have difficulty in finding grilled eel, you can substitute it with salmon (cut into cubes).
Ingredients
- Grilled Eel (small pieces)
- Yellow Onion
- Eggs
- Unagi/Teriyaki Sweet Sauce - Available in supermarkets in the Japanese section
- Seaweed and Spring Onions for garnish
Steps
1) Add oil to the pan. I used my happy call pan for the grill effect. But of course, any frying pan will do. Throw in the onions.
2) Toss it and add a bit of the unagi sauce to the onions to sweeten and caramelised it up.
3) Then throw in the eel and toss it. Add more sauce if you like it.
4) Finally, throw in the beaten eggs to let it cover all the eel and onions. I do not like my eggs to be overcooked but slightly mushy. It's nicer.
5) Remove from pan neatly and garnish with spring onions and seaweed (I used my ready cut up seaweed from a packet)
This dish is great with rice! You can actually place this on top of the rice. You can also make miso soup to go with this meal.
Enjoy!
Tuesday, April 15, 2014
Pan-fried Squid with Miso Sauce
In my opinion, having a box of miso paste is a must-have in the fridge. Miso paste is very versatile. As and when I feel like cooking noodles soup, I add miso paste to the soup and it instantly taste nice. You can also use this paste for marination, like how I am going to show you in this post. Or even use this paste to cook Kang Kong Vegetables if you do not want the usual sambal belachan version since you have young children at home. So, do keep a tub in your fridge. It is quite lasting!
Basically, the Shiro (White) Miso is a milder type as compared to the Aka (Red) Miso. The Aka one is stronger in taste. So its your preference.
Apart from miso, I also have Japanese sauces in my fridge which I love. I use it when I fry salmon, marinate beef or pork slices if I feel like cooking Japanese. Below is actually a Yakitori sauce, but it works well. Basically I am going for the teriyaki, sweet sauce type of taste.
Here's a miso soup with noodles recipe for you if you are interested- Egg Noodles with Chicken Miso Soup
Anyway, below is a recipe that is so simple yet tasty. I am sure everyone can cook this at home.
Ingredients
1) Miso Paste
2) Teriyaki/ Japanese sweet sauce
3) Squid
4) Yellow Onions
5) Dried Parsley or spring onions for garnish
Steps
1) Wash and slice the squid. Here's a step-by-step picture guide on how to wash and cut it! Very informative!
2) Then marinate it with miso paste.
3) Slice up the whole onion
4) Throw in the sliced onions into the frying pan with oil
5) While frying the onions, I squeeze in a bit of the Japanese Sauce marinate to let the onions cook faster and make the onions tastier.
6) Then I throw in the squid and toss quickly since squid cooks very fast. Be sure not to overcook it as it can become rubbery. At this juncture, you can also squeeze some Japanese sauce onto it for colour and taste.
7) Taste it and see if you are satisfied before switching off the fire.
8) Finally, garnish with dried parsley or spring onions
You can eat this with a bit of gravy or minimal gravy. It's up to you. Just make sure the taste of the gravy is to your liking before you off the fire.
ENJOY!
Basically, the Shiro (White) Miso is a milder type as compared to the Aka (Red) Miso. The Aka one is stronger in taste. So its your preference.
Apart from miso, I also have Japanese sauces in my fridge which I love. I use it when I fry salmon, marinate beef or pork slices if I feel like cooking Japanese. Below is actually a Yakitori sauce, but it works well. Basically I am going for the teriyaki, sweet sauce type of taste.
Here's a miso soup with noodles recipe for you if you are interested- Egg Noodles with Chicken Miso Soup
Anyway, below is a recipe that is so simple yet tasty. I am sure everyone can cook this at home.
Ingredients
1) Miso Paste
2) Teriyaki/ Japanese sweet sauce
3) Squid
4) Yellow Onions
5) Dried Parsley or spring onions for garnish
Steps
1) Wash and slice the squid. Here's a step-by-step picture guide on how to wash and cut it! Very informative!
2) Then marinate it with miso paste.
3) Slice up the whole onion
4) Throw in the sliced onions into the frying pan with oil
5) While frying the onions, I squeeze in a bit of the Japanese Sauce marinate to let the onions cook faster and make the onions tastier.
6) Then I throw in the squid and toss quickly since squid cooks very fast. Be sure not to overcook it as it can become rubbery. At this juncture, you can also squeeze some Japanese sauce onto it for colour and taste.
7) Taste it and see if you are satisfied before switching off the fire.
8) Finally, garnish with dried parsley or spring onions
You can eat this with a bit of gravy or minimal gravy. It's up to you. Just make sure the taste of the gravy is to your liking before you off the fire.
ENJOY!
Subscribe to:
Posts (Atom)